Product Availability Status
Product Availability Status
The Product Availability Status module is part of the Embedded ERP package and provides features to display some advanced availability messages on the website front end.

This feature is compatible with all simple, virtual and configurable products.

You can apply custom CSS styles to customize the look & feel of availability messages displayed.
The module CSS stylesheet can be found at :
app/code/BoostMyShop/AvailabilityStatus/view/frontend/web/css/style.css
Here’s an availability message example :
Configuration
The configuration is available from menu Stores > Configuration > Product Availability Status.
General
From this section you can enable or disable the display of the availability message on each product front end page.
It’s also recommended to disable Magento option “Store > Configuration > Catalog > Inventory > Display Products Availability in Stock on Storefront”, else you’ll have two availability messages displayed on the website frontend : Magento & ERP ones.
In stock
Here you control what message will be displayed
when the product is available in one of the warehouse used for sales for the current website.
Label
Contains the text to display (you can configure this text by store view to handle translations)
Css class
You can use custom css class to control the look and feel of the message
Use warehouse delay
Here you can define if you want to add a delay in the availability message calculation, related to the warehouse the product belongs to, that will be defined at warehouse level.
Ranges for warehouse delay
If the previous option has been enabled, a new "Ranges for warehouse delay"' will appear.
From this section, you can setup different ranges based on warehouse delay, each range having a specific "Message" that you can define.
Then, depending of the warehouse delay used (the shortest delay will be taken between the ones of all warehouse(s) where the product is in stock), the mathing "Message" will be taken as product availability message.
Back order
Here you control what message is displayed
when the product is not available in one of the warehouse used for sales and the backorder is enabled for the product.
Depending of the context, several options are available :
Use expected PO ETA
If you enable this option and a Purchase Order is expected for the product, then the system displays the message configured in the next setting
Expected PO label
Here you can customize the message displayed when a purchase order is expected for the product.
You can use codes m / d / y to include the month / day / year in your message.
For instance, if the PO ETA is 2017-05-23, then using pattern “Back in stock at {m}/{y}” will print message “Back in stock at 05/2017”
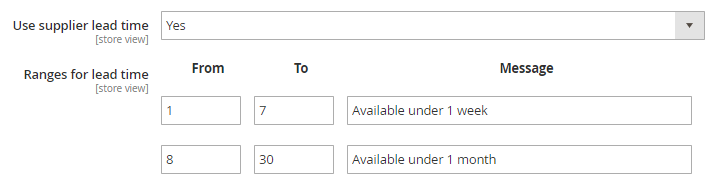
Use supplier lead time
If you don’t want to use puchase orders ETA or if no PO is expected for the product, you can use the lead time defined at supplier level to calculate the availability message.T
To calculate the lead time for a product, ERP collects all suppliers associated to the product and then selects the primary one (or first one if there is no primary supplier).
Lead time for supplier can be edited in the Supplier view > Settings tab > Shipping delay
Ranges for lead time
Once the lead time is known for the product, you can display different messages based on the lead time, using ranges.
For instance, the following configurations will display:
- “Available under 1 week” if the lead time is between 1 and 7
- “Available under 1 month” if the lead time is between 8 and 30
Label
The default label is used if there is no PO expected for the product AND no range for lead time.
Css class
You can use custom css class to control the look and feel of the message
Out of stock
Here you control what message is displayed when the product is out of stock (not sellable) for the current website :
Label
Contains the text to display (you can configure this text by store view to handle translations)
Use expected PO ETA
If you enable this option and if there is a Purchase Order with the ‘expected’ status for the product, then the system displays the message configured in the ‘Expected PO label’ settings
Expected PO label
Here you can customize the message displayed when a purchase order is expected for the product. You can use codes m / d / y to include the month / day / year in your message. For instance, if the PO ETA is 2017-05-23, then using pattern “Back in stock at {m}/{y}” will print message “Back in stock at 05/2017”
Css class
You can use custom css class to control the look and feel of the message
Unlock your online store's potential
Whatever your e-commerce business, discover how to streamline your operations and boost your business growth with Boostmyshop.