BMS Mobile is an Android Application to handle stock operations.

Note: this version is not maintained anymore, we strongly recommend to switch to the new version:
BMS Mobile V2Installation
You can download the apk directly here :
- Version 1.0.45 (may 2024): bms-mobile-1.0.45.apk
- Version 1.0.46 (july 2024): bms-mobile-1.0.46.apk
- Version 1.0.47 (march 2025): bms-mobile-1.0.47.apk
- Version 1.0.48 (may 2025): bms-mobile-1.0.48.apk
- Version 1.0.50 (sept 2025): bms-mobile-1.0.50.apk
- Version 1.0.51 (oct 2025): bms-mobile-1.0.51.apk
- Version 1.0.52 (nov 2025): bms-mobile-1.0.52.apk
- Fix stock take with new locations
- Version 1.0.53 (nov 2025): bms-mobile-1.0.53.apk
- Show already scanned products scanning a location on stock take
- Allow to edit a scanned quantity from stock take
- Version 1.0.55 (nov 2025): bms-mobile-1.0.55.apk
- Add support for GS1 barcodes
- Version 1.0.57 (mar 2026): bms-mobile-1.0.57.apk
- Once you have installed the version, open menu "About" to check that the version is properly installed
- If not, uninstall before and install again
Compatibility
BoostMyShop mobile is compatible with any Android device running Android version from 4.1.
For barcode scanning, BoostMyShop Mobile supports :
- Smartphone camera to capture the barcode
- Any barcode reader with bluetooth interface.
The following devices have been tested and validated with BoostMyShop Mobile :
- ScanSku - Android Barcode Scanner – Rugged M Series (1D) (https://www.scansku.com/product/rf-android-scanner-i-scansku/)
- M3 Mobile - M3 SM15W
- Zebra "MC330K" (Make sure to have DataWedge version 8.2 or more)
- Skancode Newland MT95 Kambur Pro m/ Android 11 (make sure to enable output mode to "Simulate Keystroke")
- Unitech devices (check configuration page)
- Datalogic Memor 30/30x (check configuration page)
Compatibility issue :
If you see this message on the play store even if your version is recent enough its because Google updated it's policy and forces us to update our app to require the lastest android version.
To fix that, download the zip file from this documentation, unzip it to get the .apk file and head over to this page. The apk is made to work with older android versions.
Configuration
First login
At first execution, you will be requested to enter your login details :
- URL : Your myFulfillment server URL (for example : "https://fr1.erp.boostmyshop.com"). You will have to enter the URL used for signing into your myFulfillment account in the given format.
You can automatically fill the "URL" field with an existing server address using the drop-down menu available. - Login : your myFulfillment account login
- Password : your myFulfillment account password
Then, click on the "Login" button to check if connection with myFulfillment works.
Settings
The second tab "Settings" contains all application settings, sorted by category :
If you change any setting in this tab, we advise you to restart the app to make sure they are correctly applied
Order preparation
- Warehouse: Select the warehouse to use for order preparation through the "Picking" & "Packing" screens.
- Preparation by batch: Enable the batch preparation system through the "Picking" & "Packing" screens.
Picking
Picking orders directly from "in stock" tab : Process orders picking directly from the "In stock" tab.
This option is not compatible with the "Preparation by batch" option.
- Picking by order: Process order picking order by order :
- If the "Preparation by batch" option is enabled, all batches will be displayed when you go into the "Picking" screen.
Once you go into a batch, all its order will be displayed, and you will then be able to select an order and process its picking.
- If the "Preparation by batch" option is disabled, all in-progress orders will be displayed when you go into the "Picking" screen.
Once you go into an order, you will then be able to process its picking
- Picking by product: Products to pick will be displayed one by one on the picking screen.
- Picking per bin: Enable picking per bin management. It allows to process picking using a cart with bins.
- Sort mode: Select the way products will be sorted on the picking screen.
Stock movement
Here you can configure the Stock movements settings.
If the Require Location scan option is enabled under settings, you will have to scan the location's barcode after scanning the product's barcode to save the transfer.
Here you can also set the Deafult source warehouse and target warehouse.
Transfer
The Require Location scan under Transfer, works similar to the same field under Stock movement. Once this is enabled, you will have to scan the location's barcode after scanning the product's barcode to save the transfer.
If Yes is set under Allow products modification under Transfer settings, you can add new products to the transfer by scanning the same while picking.
Scanner
- Scanner mode : Select the way barcodes will be handled by your barcode scanner.
The default option is "KEYUP", change it if barcodes are not correctly recognized by your barcode scanner when scanned.
If no barcode is being retrieved on your device when you scan one, change this option and restart the app, it should fix this issue.
Logs
This tab contains logs from calls between the application and myFulfillment servers.
It will mainly be used by BoostMyShop for debug purposes.
Global navigation
You can navigate through all application screens using the menu icon in the top-left corner :
Then, application settings are available from the gear icon in the top-right corner :
If you need to scan a barcode using your device camera from any screen handling it, click on the camera icon in the bottom right corner :
Finally, product search is available using the magnifier glass icon in the top-right corner :
On all screens, the footer will display success and error messages :
The products screen allows you to retrieve any product by scanning its barcode, to show its details then: stock levels, stock movements, sales orders, purchase orders.
To access this menu, select the "Products" entry from the main menu.
Once a product has been loaded in this screen, you will be able to edit its location and stock level in any warehouse, or update its barcode
Information displayed will be product name, SKU, barcode & manufacturer.
Product details will be displayed through 4 different sections :
- Stock levels
- Sales orders
- Stock movements
- Purchase orders
Stock levels
In this tab, you will see for each warehouse the product physical & available stock levels, and its shelf location (on the right).
Stock levels update
To edit the physical stock of the product in a specific warehouse, first click on the required line :
Then, a pop-up will be displayed, from where you can click on +(plus) or -(minus) buttons, to adjust the stock level in the selected warehouse :
Click on "Save" to validate your changes.
Location update
To edit the shelf location of the product in a specific warehouse, first click on the required location :
This will open a pop-up from where you can scan the new location barcode or enter it manually :
Click on "Save" to validate your changes if you type the location manually, it will be done automatically if you set the new location scanning it with a barcode scanner.
Sales Orders
In this tab, all sales orders related to the current product will be displayed:
You will see a few figures for each order: its reference, the name of the customer associated, creation date, the quantity that was ordered, and the current order state.
Stock movements
In this tab, all stock movements related to the current product will be displayed:
You will see much information about each stock movement: creation date, "from" & "to" warehouses, description and name of the user who had created it.
Purchase Order
In this tab, all purchase orders related to the current product will be displayed:
You will see a few figures about each purchase order: supplier associated, qty ordered, buying price.
If you click on a PO from there, it will lead you to the "Receptions" tab of the application, and will display products to receive for this PO.
Picking
The picking screen is designed to help you to collect products using an optimized picking path and checking picked products with a barcode scanner.
To access this menu, select the "Picking" entry in the main menu.
The picking screen shows every product to pick for orders in the Order preparation > In progress tab for the current user:
Products are grouped by location.
The quantity picked and the quantity to pick are shown on the right.
To validate a product, you can scan its barcode OR click on the product : then, a popup opens where you can check product details and confirm the quantity picked using the "confirm picking" button:
You can check the picking progress from the header bar :
Depending of the picking progress, product background color changes:
- White background : product not picked
- Orange background : product partially picked
- Green background : product completely picked
Packing
The packing menu allows to pack orders.
Note : orders must be added in the "In progress" tab in order preparation to be able to process them.
When tapped on the "New order" You will find the products to be scanned:
The next step is to scan the order barcode printed on the picking document:
Start scanning the products from the App:
When a product quantity is partially scanned, the product is highlighted in red, once all products are picked product is highlighted in green.
After Scanning the products, it will be redirected to the Confirm packing screen.
Here you have the Weight and number of packages field, fill, and tap on Confirm Packing.
Here, the confirmation for the Order packed.
From the list view, the status of the order will be "PACKED".
Also, if the tracking number is added, it changes the order status to "Shipped".
Reception
The reception screen is designed to receive purchase orders.
To access this menu, select the "Reception" entry in the main menu.
You must first select the supplier:
Once the supplier is selected, you must select the purchase order to receive.
Only purchase orders having the status "Excepted" are available.
Once the PO is selected, the list of products is shown and you can scan products to create a new reception :
Depending on the quantity scanned for a product, the background color will change :
White background : product not scanned
Orange background : quantity received is lower than the quantity ordered
Green background : quantity received matches to the quantity ordered
Red background : quantity received is over the quantity ordered
You can also manually confirm the quantity received for a product by clicking on the product, then select the quantity with the slider and save :
Once all products are picked, click on the button "Save reception" at the end of the product list.
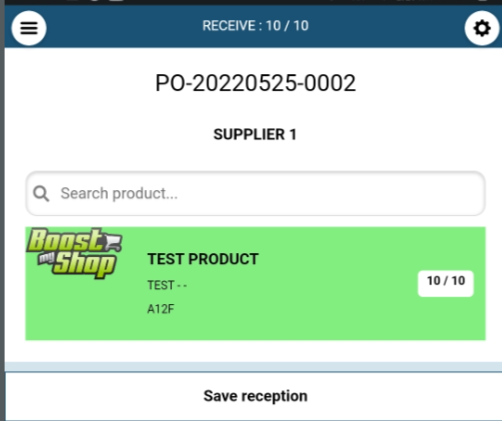
Confirmation pop-up lifts. Tap on yes.
Also, the successful message appears, if the PO completed successfully.
Locations
Here you can scan a specific product's location and manually adjust the stock.
Once the location is scanned, it will list down the products available in that location.
Clicking on the product will allow you to manually adjust the stock for the product. Here you can enter the required stock, provide the reason for changing the stock and save it.
You will have to select the specific warehouse under Settings > Order preparation. And the location of the product in that warehouse should be scanned.
Scenario: Lets say you have two warehouses A and B. The location of a specific product in warehouse A is xxx and the location of same product in warehouse B is yyy. If you've selected the Warehouse A under order preparation section and try to scan the barcode of location yyy, the error "Unknown Barcode" will be promted. You will have to scan the barcode of location xxx when the warehouse is A or change the warehouse to B and scan the location yyy.
Stock Movement
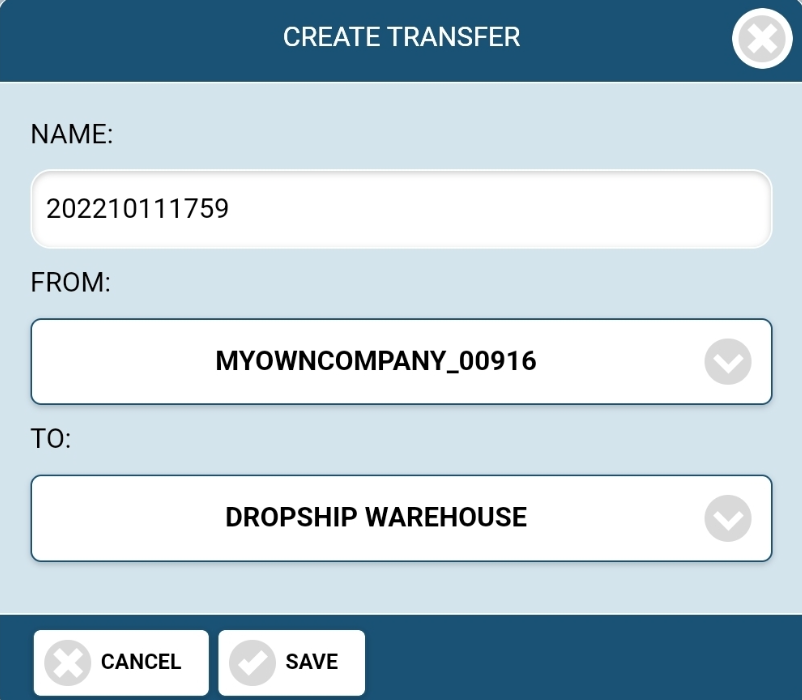
This helps in creating a quick transfer of products between two warehouses.
Once you head to the Stock Movements tab under the hamburger icon, you will have to select the Source warehouse and Target warehouse to transfer the stock from one warehouse to another:
After selecting the warehouses, click on the tick button at the bottom. In the next page, you can scan the barcode of product to be transferred. Once the product's barcode is scanned, the transfer will be made.
Click on the camera button at the bottom to scan the products.
If the Require Location scan option is enabled under settings, you will have to scan the location's barcode after scanning the product to save the transfer.
Transfers
Stock Transfer is the same as Desktop system. You need to select the From and To warehouses and start scanning the products and tap on "Transfer".
This will transfer the stock from the selected warehouse to the destination warehouse.
After scanning the products, tap on receive.
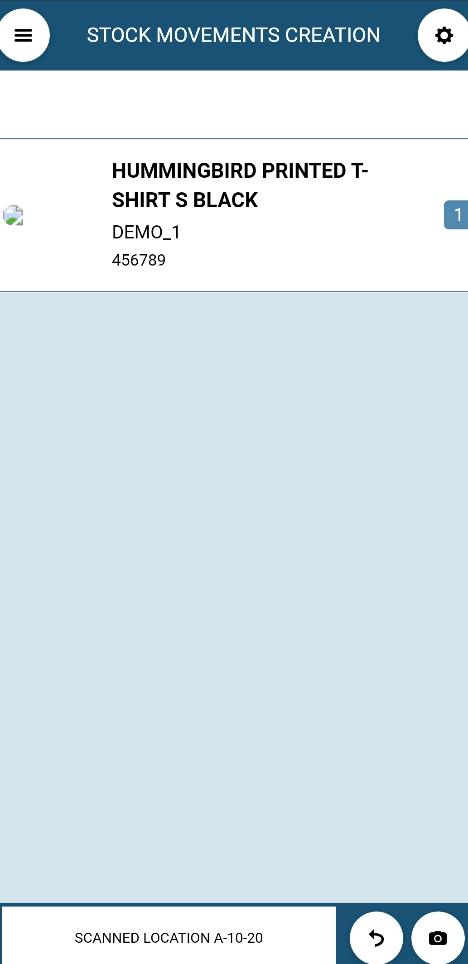
Stock Take
The Stock Take feature has been made to help you to check if your warehouse(s) physical stock matches with the MyFullfillment one for each product.
Firstly, Create a new Stock take with name, warehouse, mode(Partial / Full), use bin locations.
Scan the Location and start scanning the products.
And tap on Apply Stock take.
About
This will give us the information of the MyFullfillment APP version.
